Understanding the anatomy of a roof is essential for every homeowner. Whether you’re facing repairs, planning a replacement, or simply want to communicate more effectively with contractors, knowing the different parts of your roof empowers you to make informed decisions. This comprehensive guide breaks down every component of a roofing system, from the structural elements you never see to the outer layers that protect your home from the elements.
What Is the Anatomy of a Roof? (Overview)
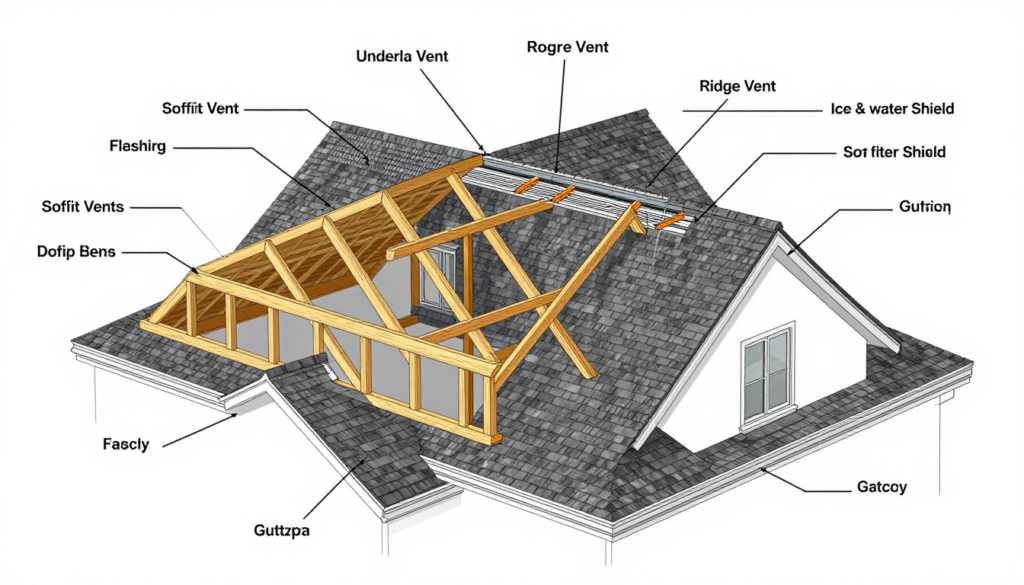
Diagram: Complete anatomy of a roof showing all major structural and exterior components
A roof is much more than just the shingles you see from the street. It’s a complex, integrated system of components working together to protect your home from weather while providing structural support. Each part serves a specific purpose, and the failure of even one component can compromise the entire system.
The roof anatomy consists of four main categories of components:
- Structural elements that provide support and shape
- Weatherproofing layers that prevent water intrusion
- Exterior components that form the visible roof surface
- Ventilation and drainage systems that regulate airflow and water runoff
Understanding how these components work together helps you identify potential issues before they become major problems. It also allows you to ask the right questions when getting estimates for roof work and ensure that contractors aren’t cutting corners on essential elements.
Roof Structure — The Skeleton of Your Roof
The structural components form the foundation of your roofing system. These elements determine the shape of your roof and provide the necessary support for all other components. Think of this as the skeleton of your roof — invisible from the outside but critical to the overall integrity of the system.
Rafters vs. Trusses — What Holds Your Roof Up

Comparison: Traditional rafters (left) vs. prefabricated trusses (right)
Rafters and trusses are the main structural supports that hold up your roof. While they serve the same purpose, they differ significantly in design and construction:
Rafters
- Individual sloped beams, typically 2×10 or 2×12 lumber
- Extend from the ridge (peak) to the exterior walls
- Built on-site during construction
- Create more usable attic space
- Traditional construction method
Trusses
- Prefabricated triangular units using smaller 2×4 lumber
- Engineered for specific loads and spans
- Installed as complete units
- More economical and faster to install
- Common in newer construction
In Ohio’s climate, roof structures must be designed to handle significant snow loads during winter months. Local building codes specify minimum requirements for rafter and truss sizing based on roof span and expected loads.
Roof Decking (Sheathing) — The Foundation Layer
Roof decking, also called sheathing, is the solid surface installed over the rafters or trusses. This continuous layer of material provides a nailing surface for the roofing materials above and contributes to the structural integrity of the entire roof.
The two most common types of roof decking are:
- Plywood: Traditional choice, available in various thicknesses (typically 1/2″ to 5/8″ for residential roofs)
- Oriented Strand Board (OSB): More economical option made from compressed wood strands, now used in approximately 75% of new construction
Damaged or rotted decking is often discovered during roof replacement and must be addressed before new roofing materials are installed. Water stains on your ceiling or a sagging roofline can indicate decking problems.
Ridge Board, Purlins & Collar Ties
Several additional structural elements work together with rafters or trusses to create a stable roof frame:
- Ridge Board: The horizontal beam at the peak where rafters meet
- Collar Ties: Horizontal members connecting opposing rafters in the upper third of the attic space to prevent spreading
- Purlins: Horizontal supports that provide additional reinforcement to rafters, especially in areas with heavy snow loads
- Ceiling Joists: Horizontal members that form the ceiling structure and help prevent exterior walls from spreading outward
These components work together to create a stable framework that can withstand wind uplift, snow loads, and other stresses that Ohio homes experience throughout changing seasons.
Weatherproofing Layers — Your Roof’s Hidden Defense System
Between your roof’s structural components and the outer covering lie critical weatherproofing layers. These components form a multi-layered defense system against water intrusion, which is the primary threat to your roof’s integrity and your home’s interior.
Underlayment — Felt vs. Synthetic

Comparison: Traditional felt underlayment (left) vs. synthetic underlayment (right)
Underlayment is the water-resistant or waterproof layer installed directly on the roof deck before the final roofing material. It provides a secondary barrier against moisture and protects the decking during installation.
| Feature | Felt Underlayment | Synthetic Underlayment |
| Material | Asphalt-saturated organic felt | Polypropylene or polyethylene |
| Weight | 15# or 30# (heavier is better) | Lightweight, easier to install |
| Durability | Can tear, wrinkle, or absorb moisture | Tear-resistant, lies flat, water-resistant |
| Weather Exposure | Limited exposure time (hours to days) | Extended exposure time (weeks to months) |
| Cost | More economical | Higher initial cost |
While felt underlayment has been used for decades, synthetic options have gained popularity due to their superior performance and durability. For homes in Dayton and throughout Ohio, synthetic underlayment provides better protection during the installation process, especially when unexpected weather delays occur.
Ice and Water Shield — Critical for Ohio Winters
Ice and water shield is a specialized type of underlayment with adhesive backing that seals around nail penetrations. It’s installed in vulnerable areas to prevent water intrusion from ice dams and wind-driven rain.

Ice and water shield installation along roof eaves to prevent damage from ice dams
In Ohio, building codes require ice and water shield to extend at least 24 inches inside the exterior wall line of your home. However, many quality contractors install it:
- Along all eaves (36″ minimum)
- In all valleys
- Around chimneys, skylights, and other roof penetrations
- At all roof-to-wall transitions
This additional protection is essential in our freeze-thaw climate, where ice dams can force water under shingles and into your home. The self-sealing nature of ice and water shield creates a watertight barrier even when nails penetrate the material.
Vapor Barriers & Moisture Control
Proper moisture control within your roof system is critical for preventing condensation that can lead to mold, rot, and reduced insulation effectiveness. A vapor barrier or retarder helps manage the flow of moisture through your roof assembly.
The placement of vapor barriers depends on your climate zone. In Ohio’s mixed climate:
- Vapor retarders are typically installed on the warm side (interior) of the insulation
- The roof assembly should be designed to allow some drying potential to the exterior
- Proper attic ventilation works with vapor barriers to control moisture
A properly designed moisture control strategy prevents condensation issues that can silently damage your roof structure over time.
Roof Covering Materials — What You Actually See
The roof covering is the outermost layer of your roof system — the part visible from the street. This layer not only defines your home’s appearance but also serves as the first line of defense against weather elements.
Asphalt Shingles (3-Tab vs. Architectural)

Comparison: 3-tab shingles (left) vs. architectural shingles (right)
Asphalt shingles are the most common roofing material in the United States, covering approximately 80% of residential roofs. They come in two main varieties:
3-Tab Shingles
- Single layer with cutouts creating three tabs
- Flat, uniform appearance
- Typically 20-25 year lifespan
- More economical option
- Less wind resistance (60-70 mph)
Architectural Shingles
- Multi-layered for dimensional appearance
- Creates shadow lines and texture
- 30-50 year lifespan
- Higher cost but better value
- Better wind resistance (110-130 mph)
For homes in Dayton and throughout Ohio, architectural shingles provide better protection against our seasonal storms and high winds. They also add more visual appeal and can increase your home’s value.
Metal Roofing — Standing Seam & Panels
Metal roofing has gained popularity for its durability and energy efficiency. Two common types are used in residential applications:
- Standing Seam: Panels with raised seams that interlock, concealing fasteners for a clean look and superior water resistance
- Exposed Fastener Panels: Metal panels secured with screws visible on the surface, more economical but with more potential leak points
Metal roofing offers several advantages in Ohio’s climate:
- 50+ year lifespan with minimal maintenance
- Excellent snow shedding capabilities
- Energy efficiency through solar reflection
- Superior wind resistance
- Recyclable and environmentally friendly
Other Materials: Slate, Tile, Cedar, Flat Roof (TPO/EPDM)
While asphalt and metal dominate the market, several other roofing materials offer unique benefits:
- Slate: Natural stone tiles offering unmatched durability (100+ years) and classic beauty, though heavy and expensive
- Clay/Concrete Tile: Long-lasting (50+ years) with distinctive appearance, popular in Mediterranean and Spanish-style homes
- Cedar Shakes: Natural wood offering rustic charm and good insulation, though requiring more maintenance
- TPO/EPDM: Single-ply membrane systems for low-slope or flat roofs, offering excellent waterproofing
Each material has specific installation requirements and performs differently in Ohio’s varying climate conditions. Consulting with a roofing professional can help you select the best material for your home’s architecture and your budget.
Edge & Perimeter Components — Where Leaks Start
The edges of your roof are particularly vulnerable to water intrusion and wind damage. Several specialized components work together to protect these critical transition areas.
Drip Edge — Small Part, Big Job

Proper drip edge installation directing water away from the fascia and into the gutter
Drip edge is an L-shaped metal flashing installed along the edges of your roof. Despite its small size, it performs several critical functions:
- Directs water away from the fascia and into the gutters
- Prevents water from seeping under the roofing material at the edge
- Provides a clean, finished edge for the roofing material
- Supports the outer edge of shingles to prevent sagging
- Helps protect the roof deck from rot
In Ohio, building codes now require drip edge on all new roofs and replacements. It should be installed over the underlayment at the eaves and under the underlayment at the rakes for proper water management.
Fascia & Soffit — More Than Cosmetic
The fascia and soffit form the finished edge of your roof’s overhang and serve both aesthetic and functional purposes:
- Fascia: The vertical board facing outward at the edge of the roof, which supports the gutters and creates a finished appearance
- Soffit: The underside of the roof overhang, often ventilated to allow airflow into the attic
These components are typically made from:
- Wood (traditional, requires painting/maintenance)
- Aluminum (low maintenance, won’t rot)
- Vinyl (economical, variety of colors)
- Fiber cement (durable, fire-resistant)
Damaged fascia or soffit can allow pests and moisture into your attic space, leading to insulation damage and potential structural issues. Regular inspection of these components is important for maintaining your roof’s integrity.
Eave vs. Rake — Know the Difference

Diagram illustrating the difference between eaves (horizontal edges) and rakes (sloped edges)
Understanding roof terminology helps you communicate effectively with roofing professionals:
- Eaves: The horizontal lower edge of the roof that typically overhangs the wall and includes gutters
- Rake: The sloped edge of the roof at a gable end, where the roof meets the side wall
Both areas require proper flashing and finishing to prevent water intrusion, but the details of installation differ. Eaves are particularly vulnerable to ice dam formation in Ohio winters, while rakes are more exposed to wind uplift during storms.
The Flashing System — Waterproofing Every Joint & Transition
Flashing is your roof’s critical defense system at joints, transitions, and penetrations. These are the areas most vulnerable to leaks, and proper flashing installation is essential for a watertight roof.
Step Flashing & Counter Flashing (Walls & Chimneys)

Proper installation of step flashing and counter flashing at a roof-wall intersection
Where your roof meets a vertical surface like a wall or chimney, two types of flashing work together to prevent water intrusion:
- Step Flashing: L-shaped pieces installed in layers with each course of shingles, creating a water-resistant barrier
- Counter Flashing: Covers the top edge of step flashing and is embedded into the wall or chimney mortar
This two-part system creates redundant protection, directing water down and away from the intersection. Improper flashing at these transitions is one of the most common causes of roof leaks.
Valley Flashing — Open vs. Closed Valleys
Valleys, where two roof slopes meet, channel a high volume of water and require special attention. There are two main approaches to valley construction:
Open Valley
- Metal flashing remains exposed
- Shingles are cut back from center of valley
- Better water flow capacity
- Easier to clean debris
- More visible as design element
Closed Valley
- Shingles cover the valley flashing
- More uniform appearance
- Still requires proper underlayment
- Can be woven or cut method
- More prone to debris buildup
For homes in Ohio, where heavy rainfall and winter snow melt create high water volume, open valleys often provide better long-term performance, especially on roofs with a lower pitch.
Pipe Boots & Vent Flashing
Every penetration through your roof requires proper flashing to prevent leaks. Pipe boots and vent flashings create watertight seals around:
- Plumbing vent stacks
- Exhaust vents
- HVAC pipes
- Electrical conduits
These flashings typically consist of a base that integrates with the roofing material and a flexible collar that fits snugly around the penetration. The collar is often the first component to deteriorate, requiring replacement before the rest of the roof.
Chimney Crickets & Kickout Flashing

Chimney cricket installation showing water diversion around the chimney structure
Specialized flashing components address specific vulnerable areas:
- Chimney Cricket/Saddle: A triangular structure on the uphill side of a chimney that diverts water around the chimney, preventing pooling
- Kickout Flashing: Installed where the edge of the roof meets a wall, directing water into the gutter instead of behind siding
These often-overlooked components are critical for preventing concentrated water flow that can lead to serious damage over time. In Ohio’s climate with significant rainfall and snow melt, these details can make the difference between a watertight roof and costly repairs.
Not Sure About Your Roof’s Flashing Condition?
Flashing failures are the #1 cause of roof leaks. Our experts can identify potential issues before they lead to costly water damage. Schedule a free, no-obligation roof inspection today.
Roof Ventilation — The Breathing System
Proper ventilation is essential for extending the life of your roof and improving your home’s energy efficiency. A well-designed ventilation system creates a continuous flow of air through your attic space, preventing moisture buildup and regulating temperature.
Ridge Vents & Exhaust Ventilation

Balanced ventilation system showing airflow from soffit vents to ridge vents
Exhaust ventilation allows warm, moist air to exit your attic space. The most common types include:
- Ridge Vents: Installed along the peak of the roof, providing continuous exhaust ventilation
- Box Vents: Individual units installed near the ridge, less effective than continuous ridge vents
- Powered Attic Fans: Electrically powered fans that actively pull air from the attic
- Turbine Vents: Wind-powered spinning vents that create air movement
Ridge vents are generally the most effective option, as they provide continuous ventilation along the entire ridge and work with natural convection to remove hot air.
Soffit Vents & Intake Airflow
For exhaust ventilation to work properly, adequate intake ventilation is essential. This typically comes from:
- Soffit Vents: Installed in the underside of the roof overhang, allowing fresh air to enter the attic
- Drip Edge Vents: Specialized drip edge with built-in ventilation channels
- Gable Vents: Installed in the gable end walls of the attic
Proper intake ventilation ensures that fresh air can enter to replace the warm air being exhausted, creating a continuous flow through the attic space.
Why Balanced Ventilation Prevents Ice Dams in Dayton
In Ohio’s winter climate, proper attic ventilation is critical for preventing ice dams. These destructive formations occur when:
- Heat from the living space warms the attic and roof surface
- Snow melts on the warmed roof surface
- The water refreezes at the colder roof edge, forming a dam
- Water backs up behind the dam and seeps under shingles
A properly ventilated attic maintains a consistent temperature across the entire roof surface, preventing the melt-freeze cycle that creates ice dams. This is particularly important in Dayton’s climate, where freeze-thaw cycles are common throughout winter.
Balanced ventilation also provides year-round benefits:
- Reduces summer cooling costs by removing super-heated attic air
- Extends shingle life by preventing heat buildup
- Reduces moisture that can lead to mold and rot
- Improves indoor comfort and air quality
Roof Geometry — Understanding Your Roof’s Shape
Your roof’s shape and design significantly impact its performance, cost, and appearance. Understanding basic roof geometry helps you communicate effectively with roofing professionals and make informed decisions about your home.
Ridges, Hips & Valleys

Major roof geometric elements: ridge, hip, valley, eave, and rake
The main geometric elements of a roof include:
- Ridge: The horizontal peak where two roof slopes meet
- Hip: The sloped ridge formed where two roof planes meet at an outward angle
- Valley: The internal angle formed where two roof planes meet, channeling water
- Eave: The lower edge of the roof that typically overhangs the wall
- Rake: The sloped edge of the roof at a gable end
Each of these elements requires specific flashing and finishing details to ensure proper water management and weather resistance.
Gable vs. Hip Roofs — Pros & Cons
The two most common roof styles in residential construction are gable and hip roofs:
Gable Roof
- Two sloping sides that meet at a ridge
- Triangular wall section (gable) at each end
- Simpler construction, more economical
- More attic space and ventilation
- Less wind-resistant in severe storms
Hip Roof
- All sides slope downward to the walls
- No vertical end walls
- More complex construction, higher cost
- Better wind resistance
- Less attic space
In Ohio, both styles are common, but hip roofs offer better performance in high winds, which can be advantageous during severe weather events.
Roof Pitch — What the Numbers Mean
Roof pitch refers to the steepness of your roof and is typically expressed as a ratio of vertical rise to horizontal run, such as 4:12 (read as “four in twelve”).

Common roof pitches and their visual impact on home appearance
Common residential roof pitches range from 4:12 to 12:12, with each offering different advantages:
- Low Pitch (4:12 or less): More economical, easier to work on, but requires special attention to waterproofing
- Medium Pitch (5:12 to 8:12): Good balance of water shedding and construction cost
- Steep Pitch (9:12 or greater): Excellent water and snow shedding, more visible architectural feature, higher cost
In Ohio, medium to steep pitches are common to facilitate snow shedding during winter months. Your roof’s pitch affects material choices, installation methods, and overall cost.
Gutters & Drainage — Where Water Goes After Your Roof
Your gutter system is the final component of your roof’s water management strategy. Properly sized and installed gutters collect water from the roof and direct it away from your home’s foundation.

Complete gutter system showing proper water management from roof to ground
A complete gutter system includes:
- Gutters: Channels attached to the fascia that collect water from the roof
- Downspouts: Vertical pipes that carry water from the gutters to the ground
- Extensions/Splash Blocks: Direct water away from the foundation
- Guards/Screens: Optional components that prevent debris buildup
In Ohio’s climate with significant rainfall and snow melt, a properly functioning gutter system is essential for preventing foundation issues, basement water intrusion, and landscape erosion. Regular cleaning and maintenance ensure your gutters can effectively manage water runoff from your roof.
How These Components Work Together as a System
Your roof is more than the sum of its parts. Each component we’ve discussed works in concert with the others to create a complete system that protects your home from the elements while providing structural support and energy efficiency.

Exploded view showing how all roof components integrate to form a complete system
The system approach to roofing is reflected in manufacturer warranties. Companies like GAF, Owens Corning, and CertainTeed offer enhanced “system warranties” that cover all components when installed together by certified contractors.
Key system integration points include:
- Proper ventilation extends shingle life by reducing heat buildup
- Ice and water shield works with flashing to prevent leaks at vulnerable areas
- Drip edge integrates with gutters to manage water runoff
- Underlayment provides a secondary water barrier beneath the primary roof covering
When any one component fails or is improperly installed, it can compromise the entire system. This is why cutting corners on “invisible” components like underlayment or proper flashing can lead to premature roof failure, even if high-quality shingles are used.
For Ohio homeowners, a systems approach to roof installation or replacement ensures your home is protected against our region’s diverse weather challenges, from summer storms to winter ice and snow.
FAQ — Common Questions About Roof Components
What are the main parts of a roof?
The main parts of a roof include the structural components (rafters or trusses, decking), weatherproofing layers (underlayment, ice and water shield), exterior covering (shingles, metal, tile), flashing system, ventilation components, and drainage system (gutters and downspouts). Each component plays a vital role in protecting your home from the elements and ensuring the longevity of your roof system.
What is the most important layer of a roof?
While all roof layers work together as a system, the underlayment is arguably the most critical layer as it provides a secondary water barrier when the primary roof covering (shingles or metal) is compromised. In areas prone to ice dams, like Ohio, the ice and water shield is particularly important as it prevents water intrusion from backed-up water that can get under shingles. However, the integrity of the entire system depends on each component functioning properly.
How many layers does a roof have?
A typical asphalt shingle roof has 5-6 layers: 1) structural support (rafters/trusses), 2) decking/sheathing, 3) underlayment, 4) ice and water shield (in vulnerable areas), 5) flashing (at transitions and penetrations), and 6) the outer covering (shingles, metal, etc.). Some roofs may have additional layers such as radiant barriers or specialized moisture barriers depending on climate and design requirements.
What is flashing on a roof?
Flashing refers to thin pieces of water-resistant material (typically galvanized steel, aluminum, or copper) installed at roof joints, transitions, and penetrations to prevent water intrusion. Common types include step flashing (where roof meets walls), valley flashing (where two roof planes meet), chimney flashing, pipe boots (around vent pipes), and drip edge (at roof edges). Proper flashing installation is critical for preventing leaks at these vulnerable points.
What is the difference between soffit and fascia?
Soffit is the material that covers the underside of the roof overhang (eave), often containing vents for attic ventilation. Fascia is the vertical finishing edge connected to the ends of the rafters or trusses, creating a smooth, even appearance along the roofline and providing a mounting surface for gutters. Both components serve aesthetic and functional purposes, protecting the roof structure while providing a finished appearance.
How do I know if my roof decking needs replaced?
Signs that your roof decking may need replacement include: sagging areas on your roof, daylight visible through the roof in your attic, soft or spongy feeling when walking on the roof, water stains or active leaks on your ceiling, or visible rot or mold in your attic. Roof decking issues are typically discovered during roof replacement when the old roofing material is removed. A professional inspection can determine if your decking needs partial or complete replacement.
Understanding Your Roof: The Complete Picture
The anatomy of a roof is complex, with each component playing a vital role in protecting your home. From the structural elements that provide support to the outer layers that shield against weather, every part must work in harmony to create a durable, effective roofing system.
For Ohio homeowners, understanding these components helps you make informed decisions about roof maintenance, repairs, and eventual replacement. It also enables you to communicate more effectively with roofing professionals and ensure that all critical elements are properly addressed in any roofing project.
Regular inspections and maintenance of your roof system can identify potential issues before they lead to costly damage. Pay particular attention to flashing, ventilation, and drainage components, as these are common failure points that can compromise your entire roof.
Not Sure About the Condition of Your Roof Components?
Our experienced roofing professionals can provide a comprehensive inspection of your entire roof system, identifying potential issues before they become major problems. Schedule your free, no-obligation roof inspection today.